[*Best Viewed On Laptop]
MODULE SUMMARY
This module was all about understanding how architecture interacts with the environment.. so how light, heat, and ventilation shape our spaces and how we, as upcoming architects, can make smarter, more sustainable choices. Unlike other modules that focus purely on design, this one made me think beyond aesthetics and really consider how buildings function in real world conditions.
Instead of just learning theories, we actually applied real strategies to real spaces. From natural daylighting to artificial lighting design, I got to explore how different elements affect comfort, energy efficiency, and usability. What really stood out was how even the smallest design decisions can make a huge impact on sustainability and user experience.
Through both assignments, I gained a deeper appreciation for the technical side of architecture, learning how to balance practicality and aesthetics in lighting and environmental control. This module really helped me bridge the gap between design and function, something I know will be important in my future projects.
ASSIGNMENT SUMMARY
Assignment 1: Daylighting & Thermal Comfort Analysis
Overview
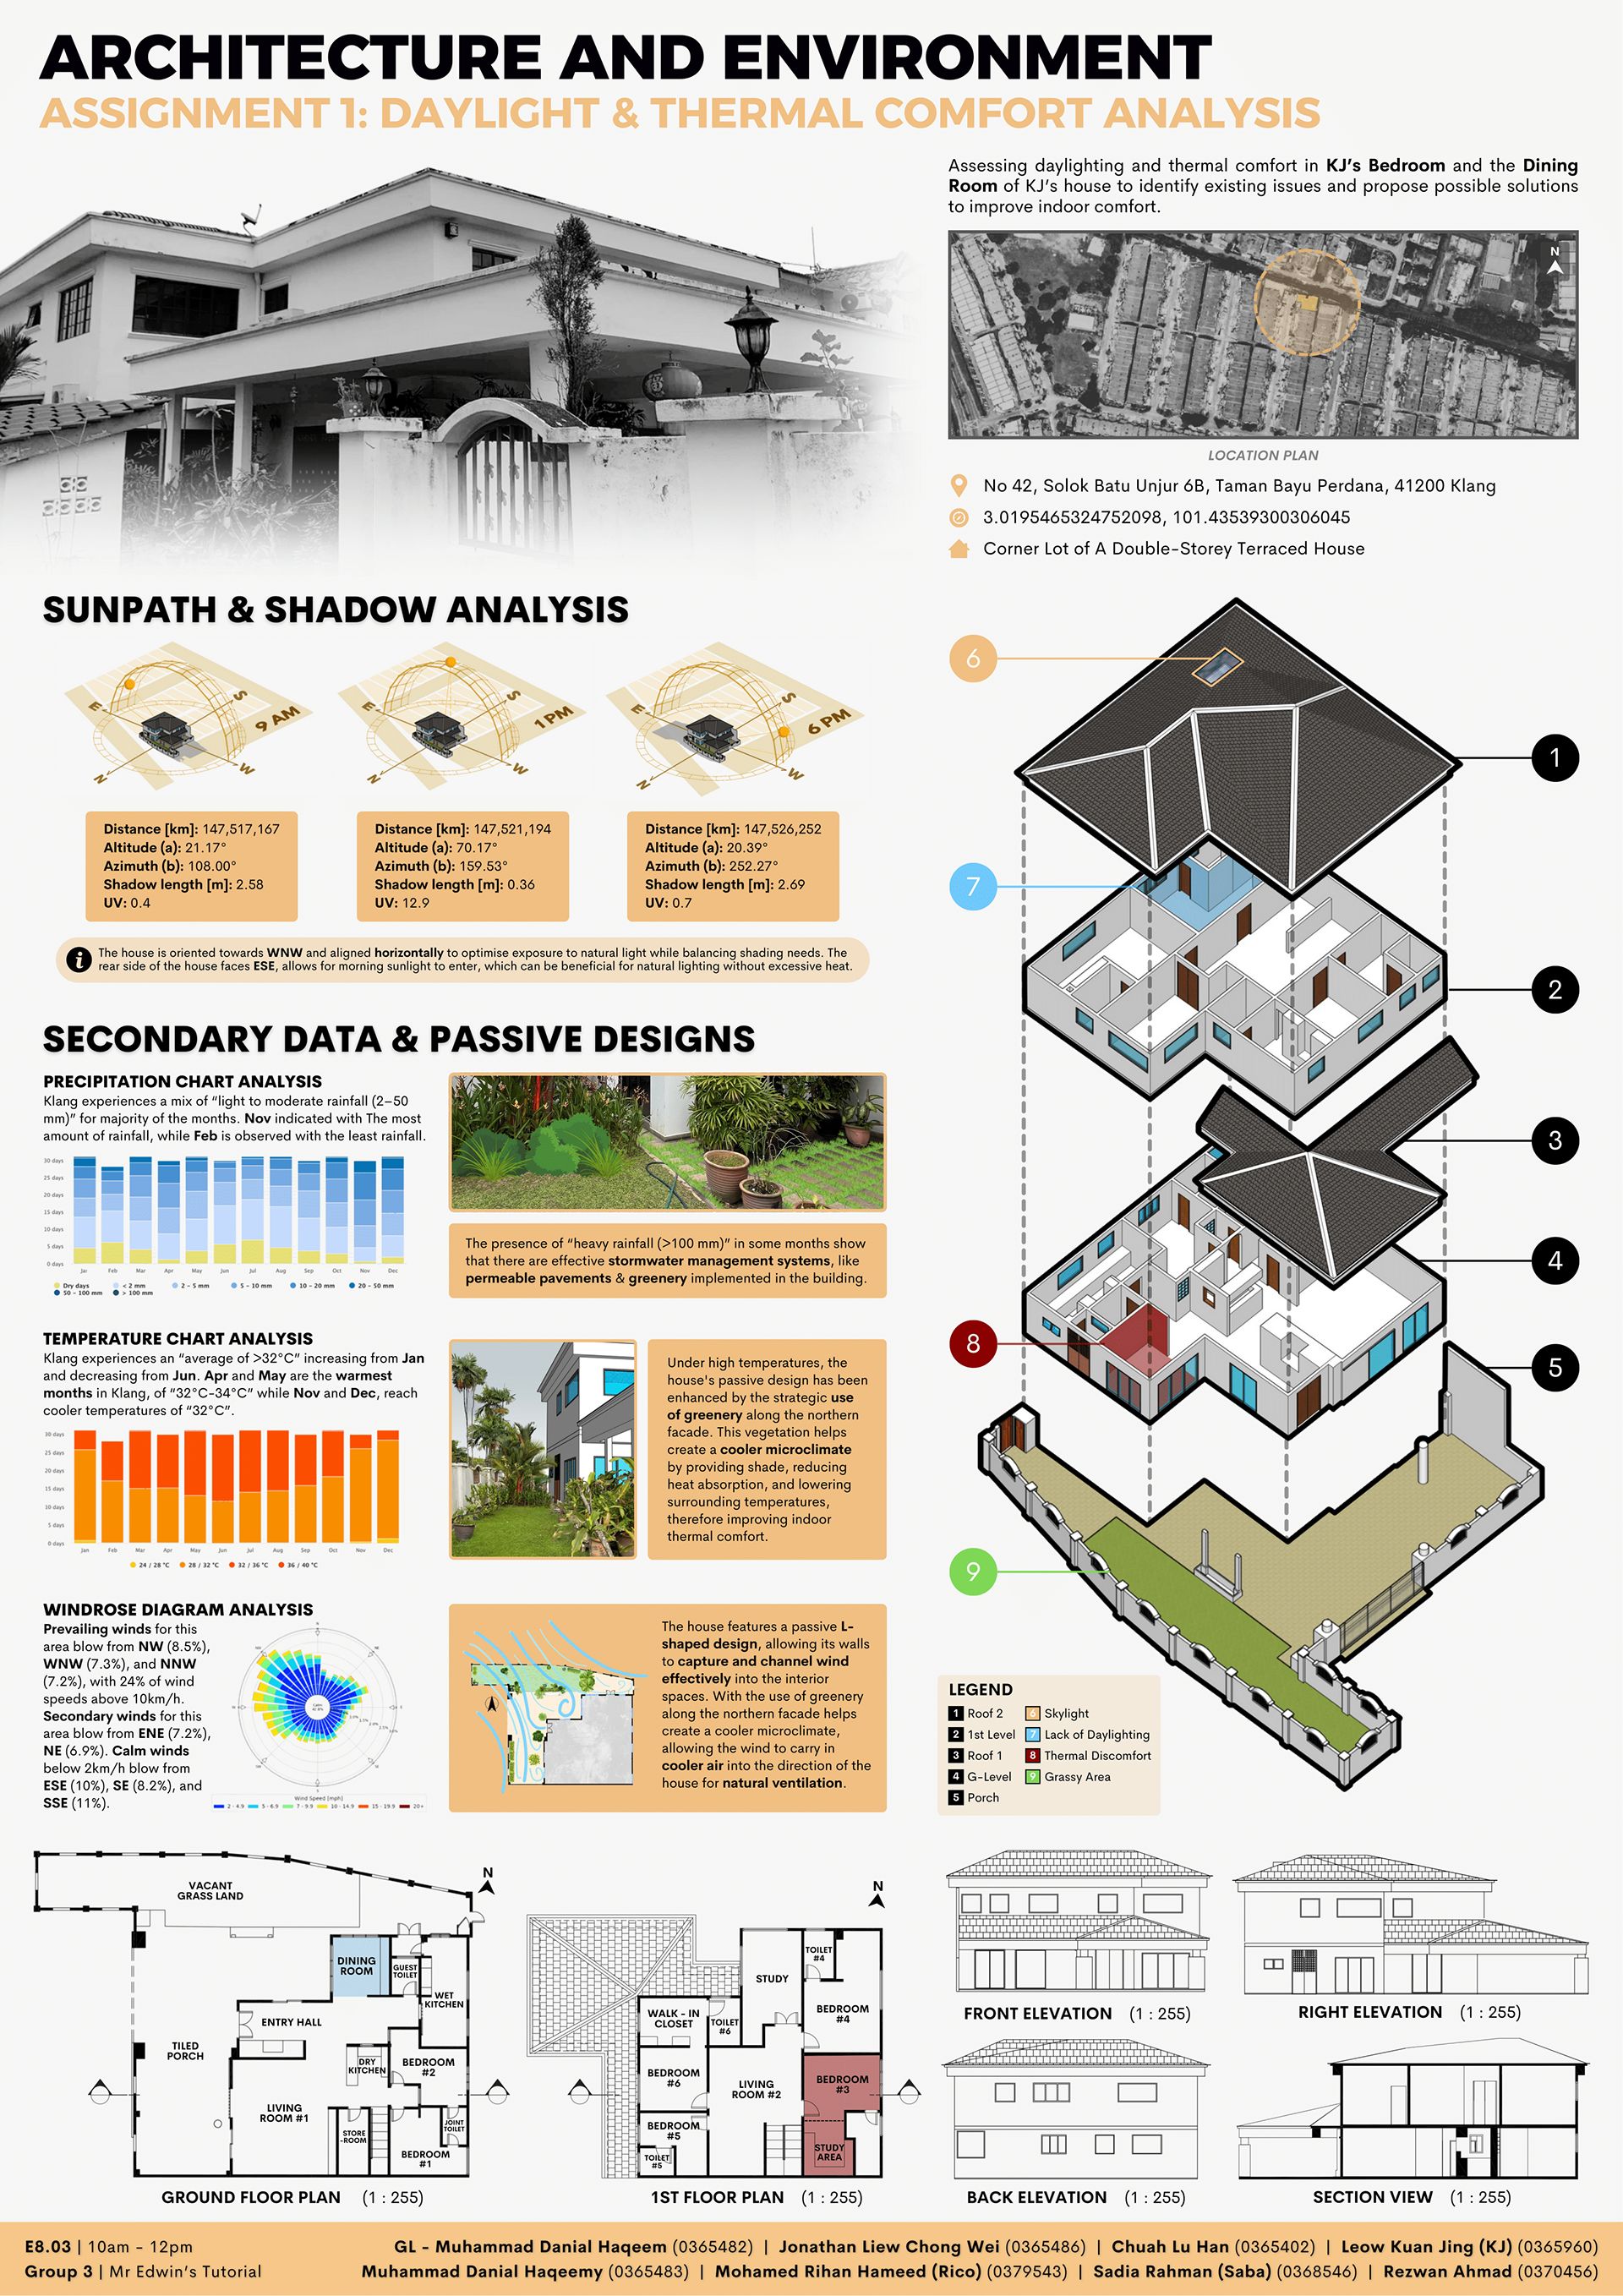
For this project, we were tasked with analysing daylight and thermal comfort in a selected residential space. Our focus was on KJ’s bedroom and the dining room in a double-storey terraced house in Klang. The goal was to identify existing daylighting and thermal issues and propose practical solutions to improve indoor comfort. This involved assessing factors like natural light penetration, heat gain, ventilation and the impact of surrounding environmental conditions.
For this project, we were tasked with analysing daylight and thermal comfort in a selected residential space. Our focus was on KJ’s bedroom and the dining room in a double-storey terraced house in Klang. The goal was to identify existing daylighting and thermal issues and propose practical solutions to improve indoor comfort. This involved assessing factors like natural light penetration, heat gain, ventilation and the impact of surrounding environmental conditions.
What I Learned
Before this project, I didn’t think much about how natural light and temperature affect indoor spaces beyond just “is it bright enough?” or “is it too hot?”. But once we started analysing daylight penetration, window orientation, and heat retention, I realised how much these factors impact comfort and energy efficiency.
Before this project, I didn’t think much about how natural light and temperature affect indoor spaces beyond just “is it bright enough?” or “is it too hot?”. But once we started analysing daylight penetration, window orientation, and heat retention, I realised how much these factors impact comfort and energy efficiency.
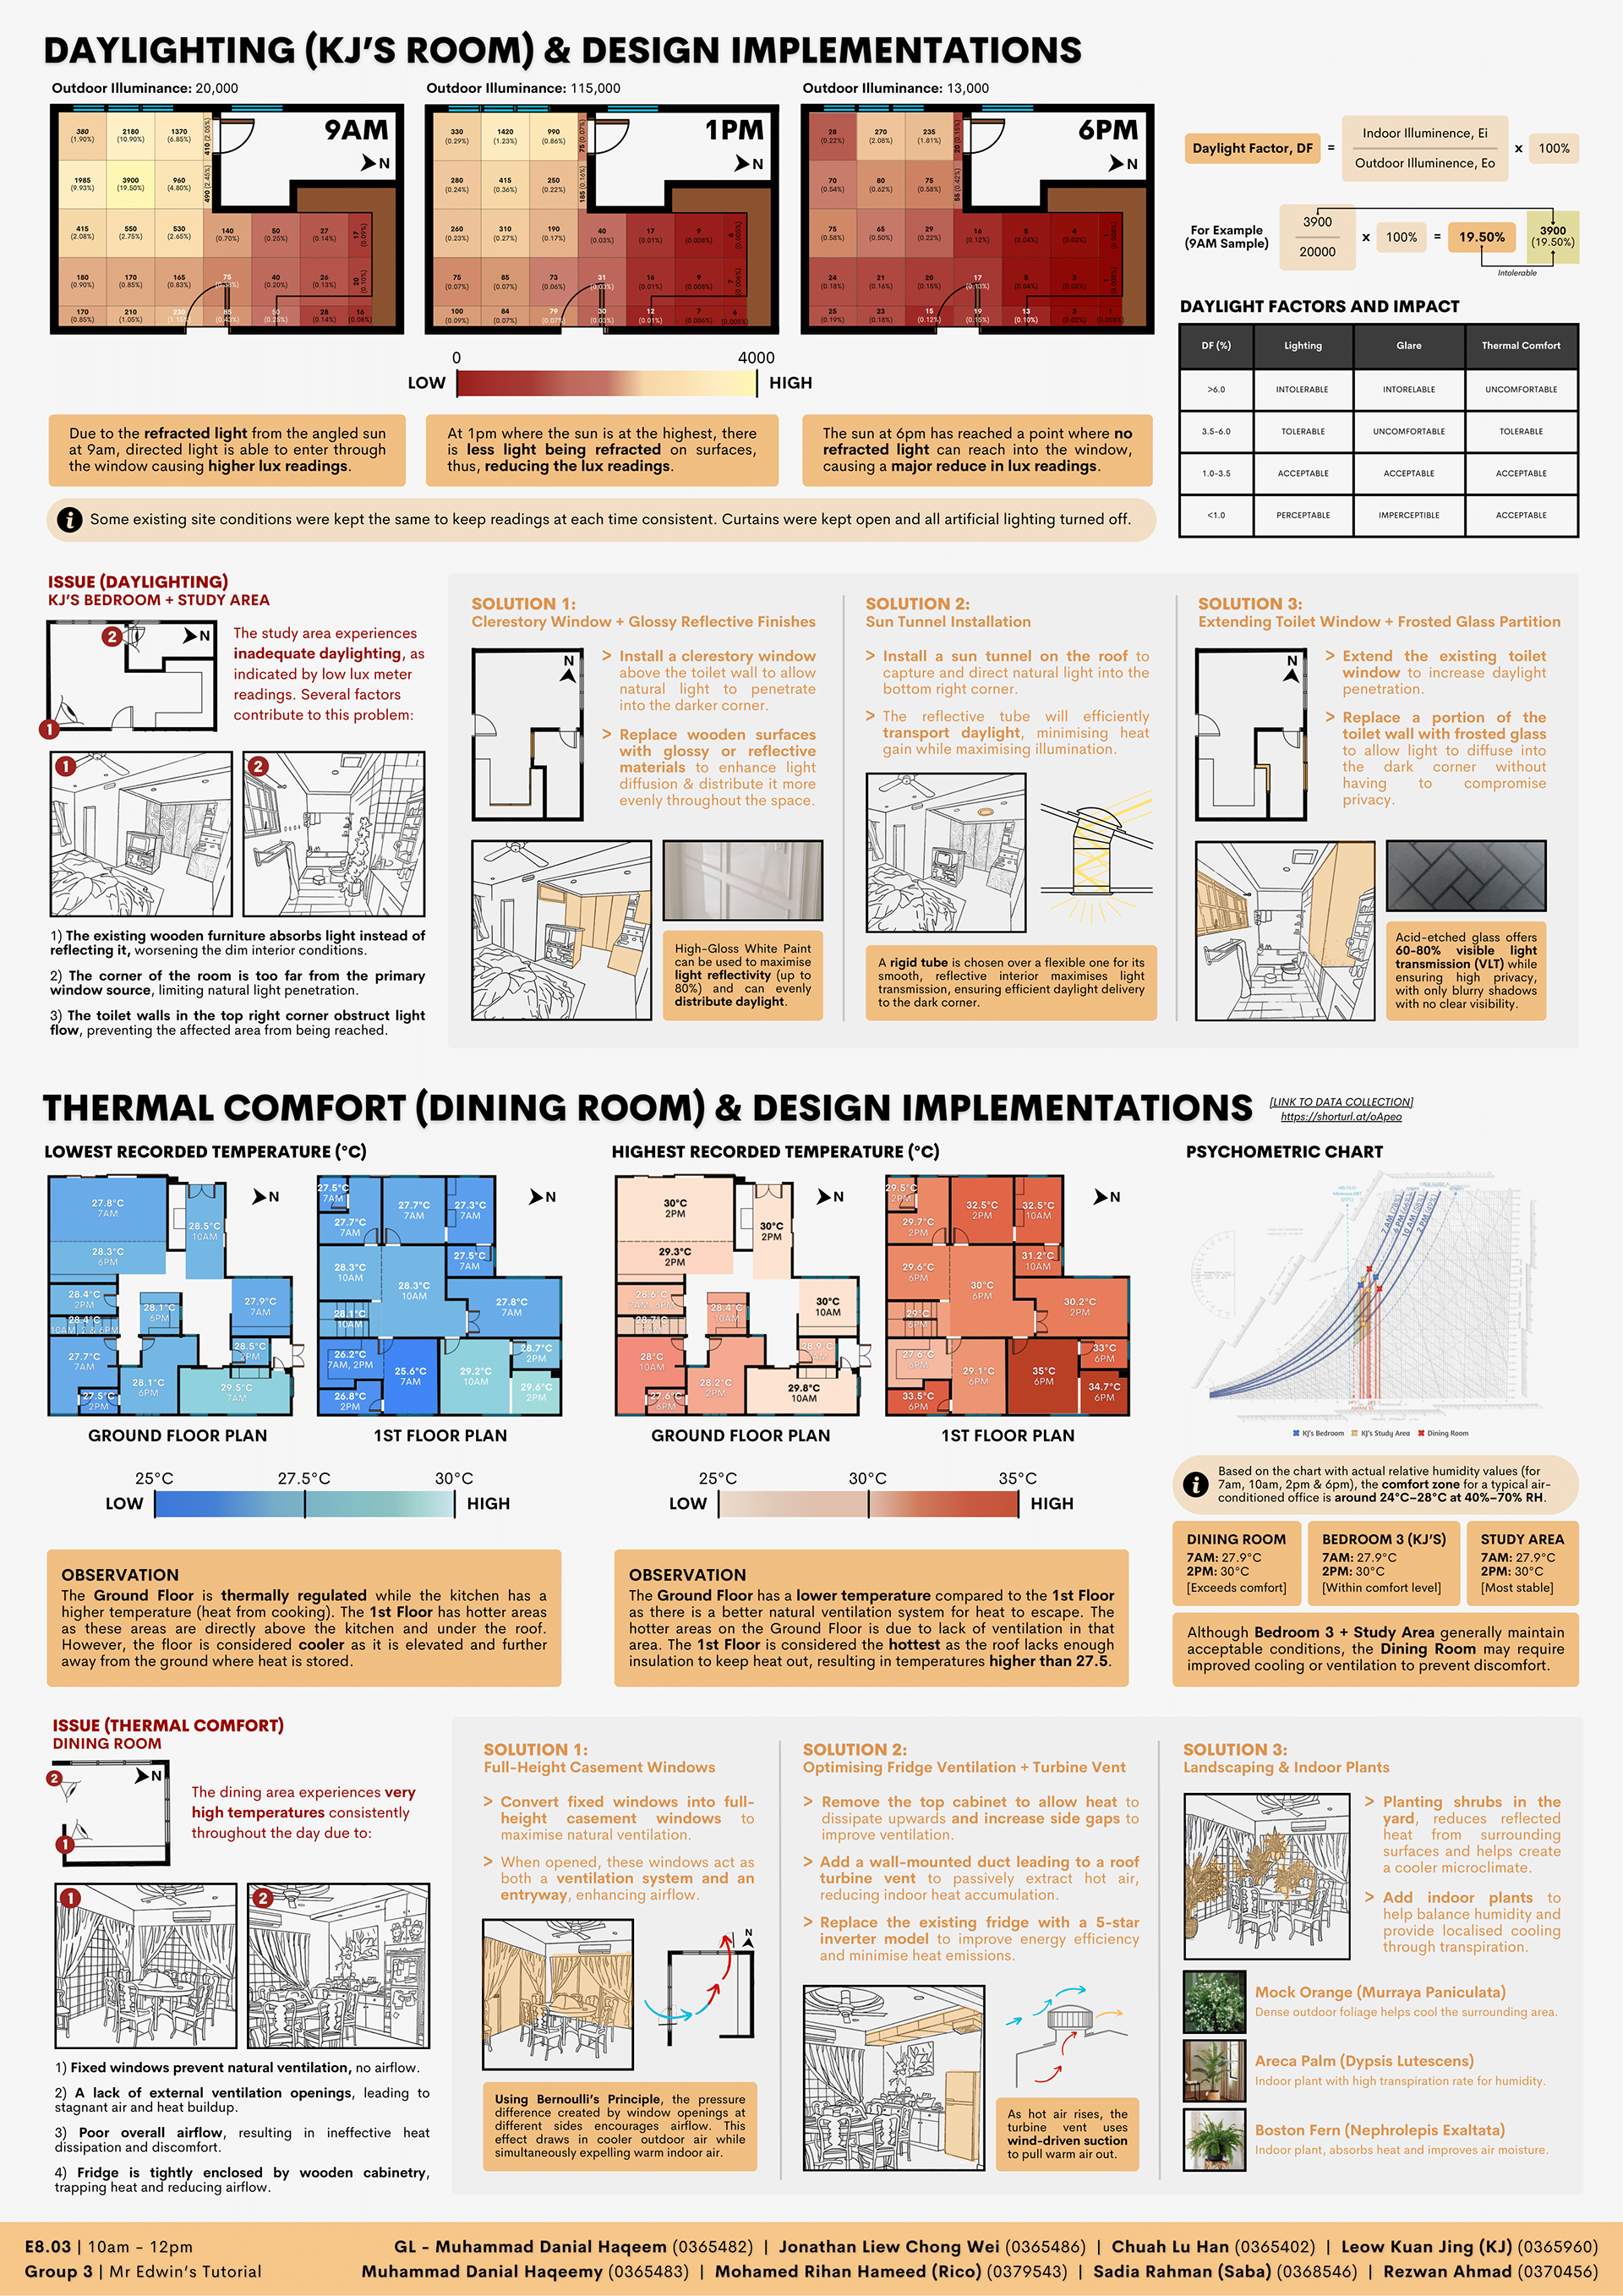
1) I learned how to assess daylight levels using sun path diagrams, lux measurements and room orientation. It was interesting to see how different times of the day and seasons affect natural light levels.
2) I never thought about how wall materials, glazing, and external shading could influence heat gain so much. It became clear why houses in hot climates need strategic shading and ventilation to stay cool.
3) Understanding wind patterns and indoor airflow was eye-opening. Small design tweaks, like window placement, can significantly improve natural ventilation.
4) I also gained a better grasp of passive design strategies, such as using greenery for cooling, reflective surfaces to reduce heat absorption, and skylights for better daylighting. These solutions aren’t just eco-friendly but also reduce energy consumption.
5) Most importantly, this project reinforced that architecture isn’t just about aesthetics.. it’s about creating spaces that respond to their environment to enhance comfort and functionality.
What Challenges I Faced?
This project had its fair share of challenges, but each one helped me develop stronger problem-solving and adaptability skills.
1) Accurately analysing site conditions was tricky. We had to rely on weather data, sun path diagrams, and real-time observations to ensure our findings were reliable.
2) Balancing daylighting and heat gain was a challenge. More windows meant better daylight, but also increased heat buildup. Finding a middle ground with shading devices and glazing types required a lot of trial and error.
3) Understanding ventilation and wind movement wasn’t as straightforward as expected. We had to consider prevailing wind directions, obstructions from nearby buildings, and internal airflow circulation.
4) Coming up with practical yet realistic design solutions was another hurdle. Some ideas worked well on paper but weren’t feasible due to structural limitations or cost constraints. We had to refine our proposals to ensure they were both effective and achievable.
5) Since this was a group project, communication and task delegation were crucial. Managing different opinions and ensuring everyone contributed equally wasn’t always easy, but strong teamwork helped us pull everything together.
Personal Reflection
Looking back, this project completely changed how I perceive daylighting and thermal comfort in architecture. It’s not just about making a space bright or cool.. it’s about optimising natural elements to create a comfortable and sustainable living environment.
Looking back, this project completely changed how I perceive daylighting and thermal comfort in architecture. It’s not just about making a space bright or cool.. it’s about optimising natural elements to create a comfortable and sustainable living environment.
Now, whenever I enter a room, I instinctively observe how light enters, how air flows, and whether the space is designed efficiently. It’s made me more aware of how small design choices can significantly impact daily life, and I know this knowledge will be invaluable in my future architectural studies.
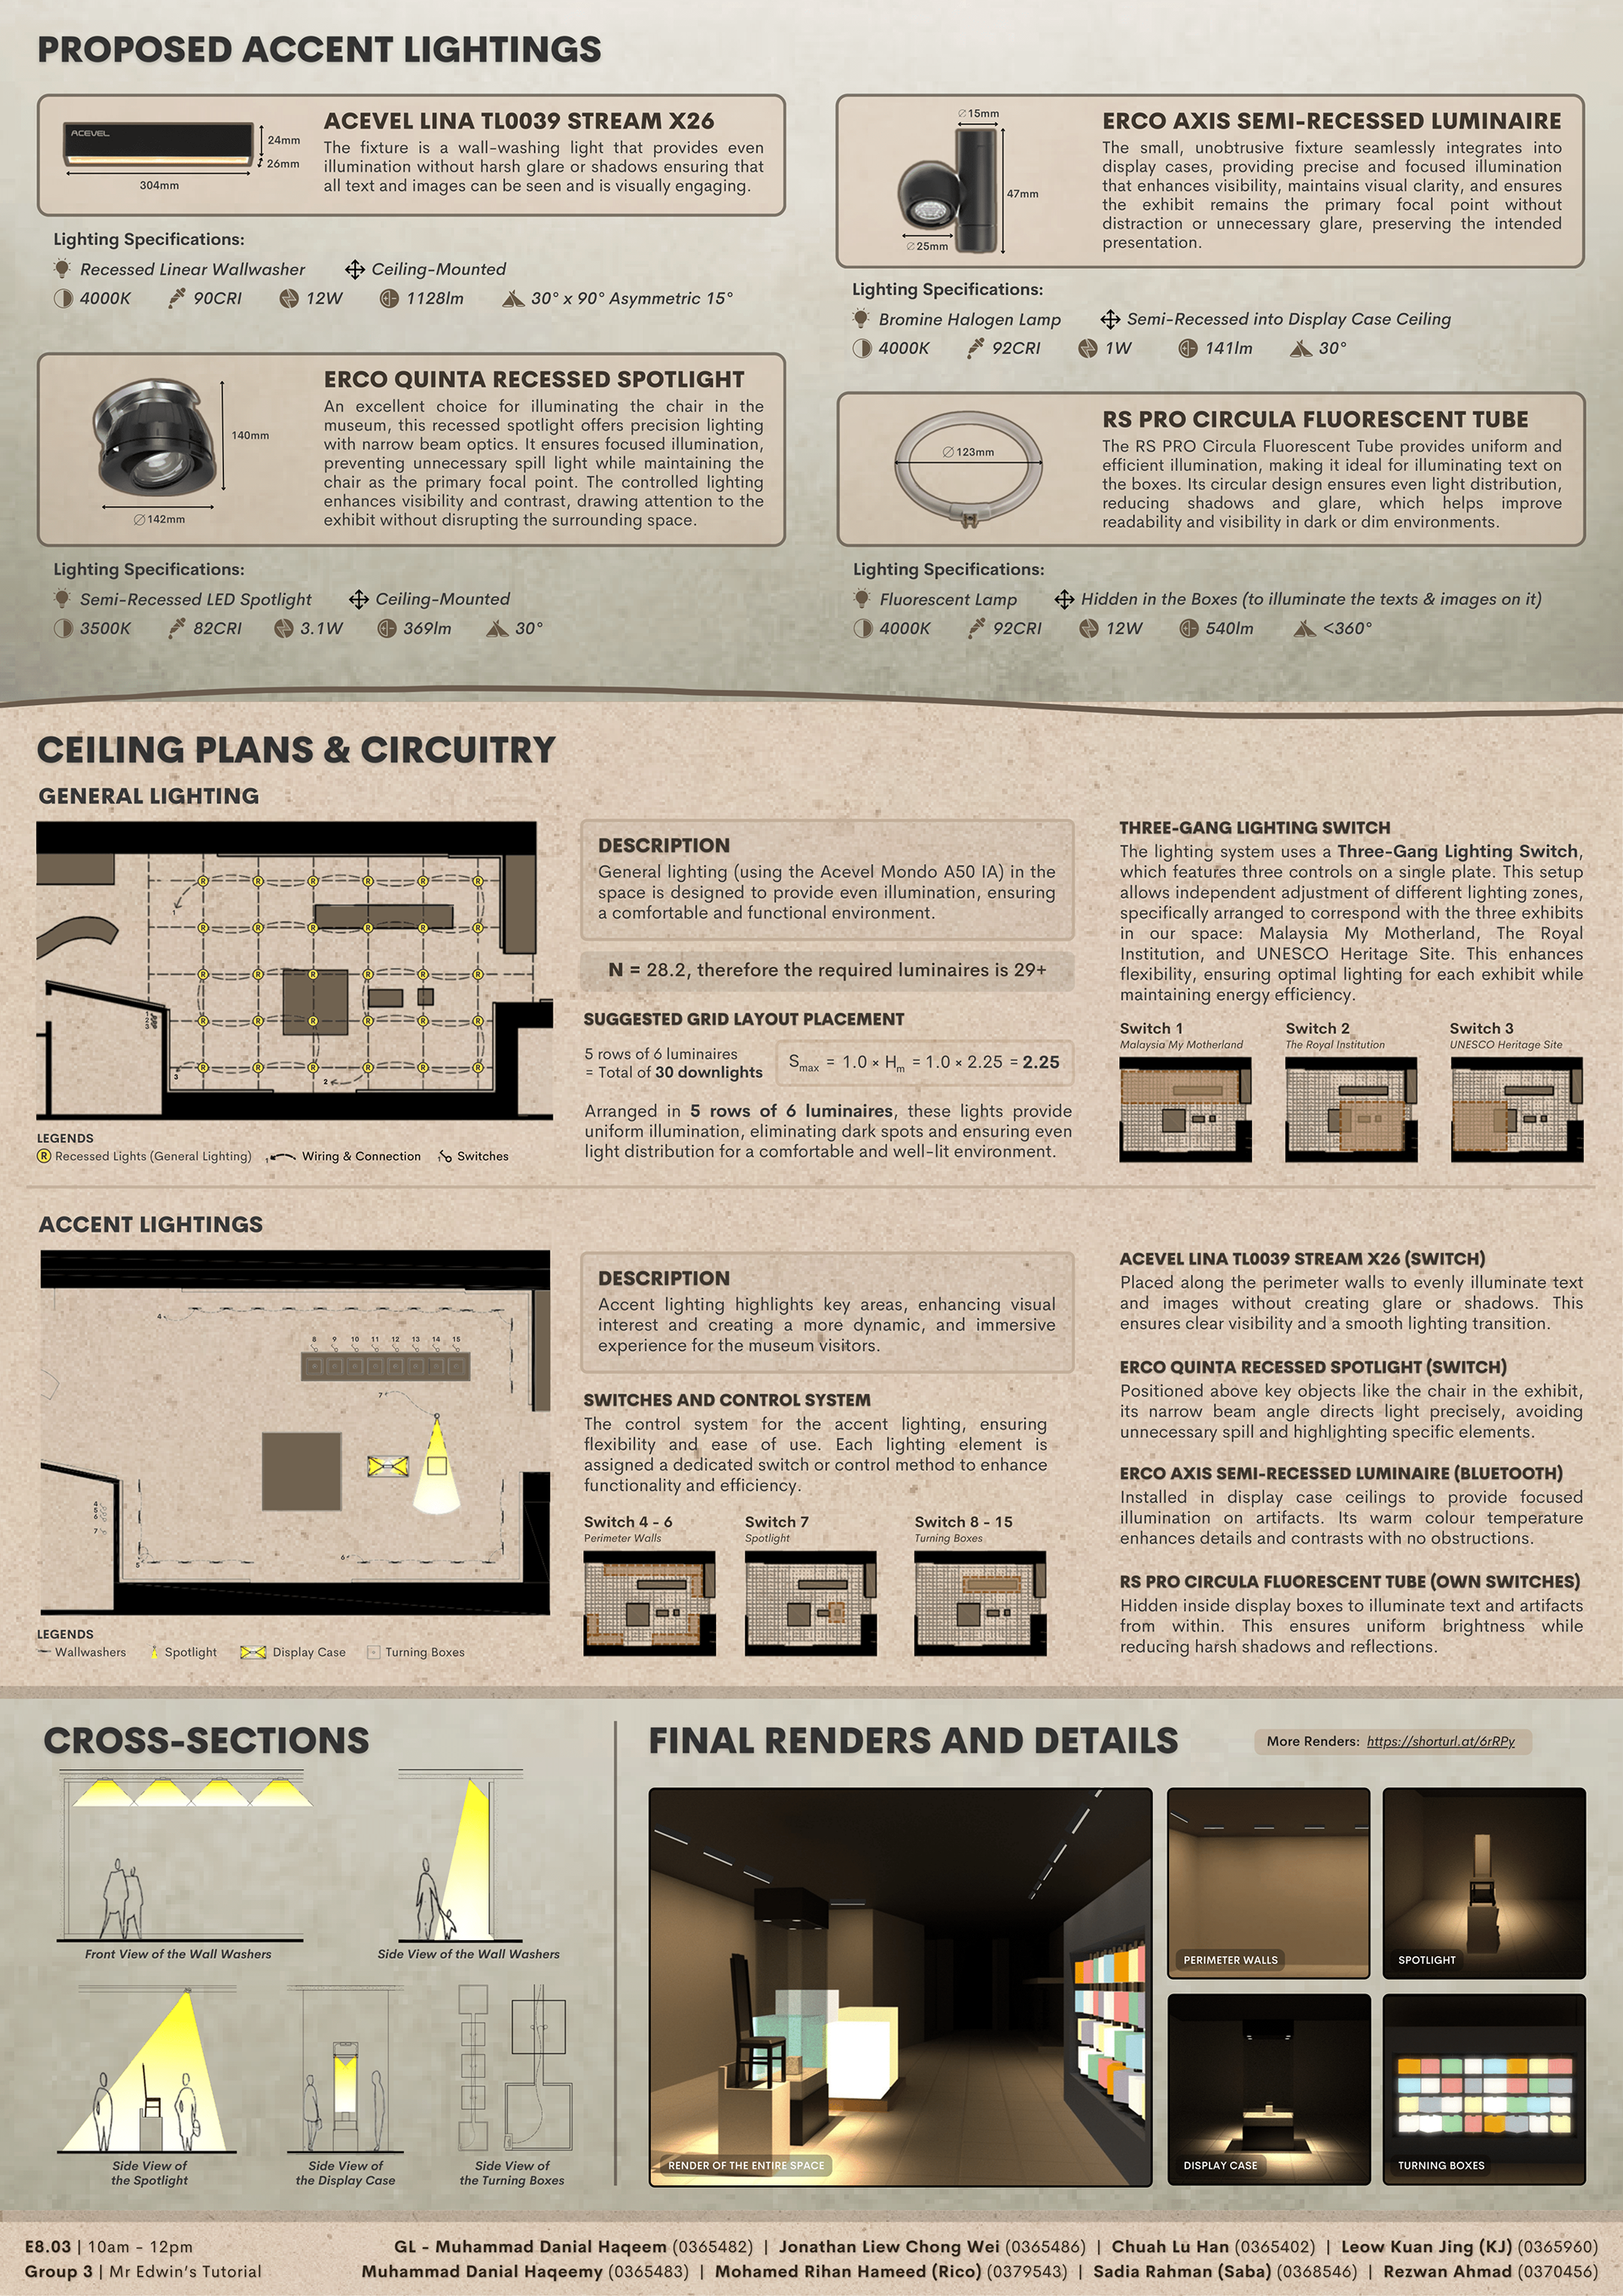
Assignment 2: Lumen Method & Lighting Design
Overview
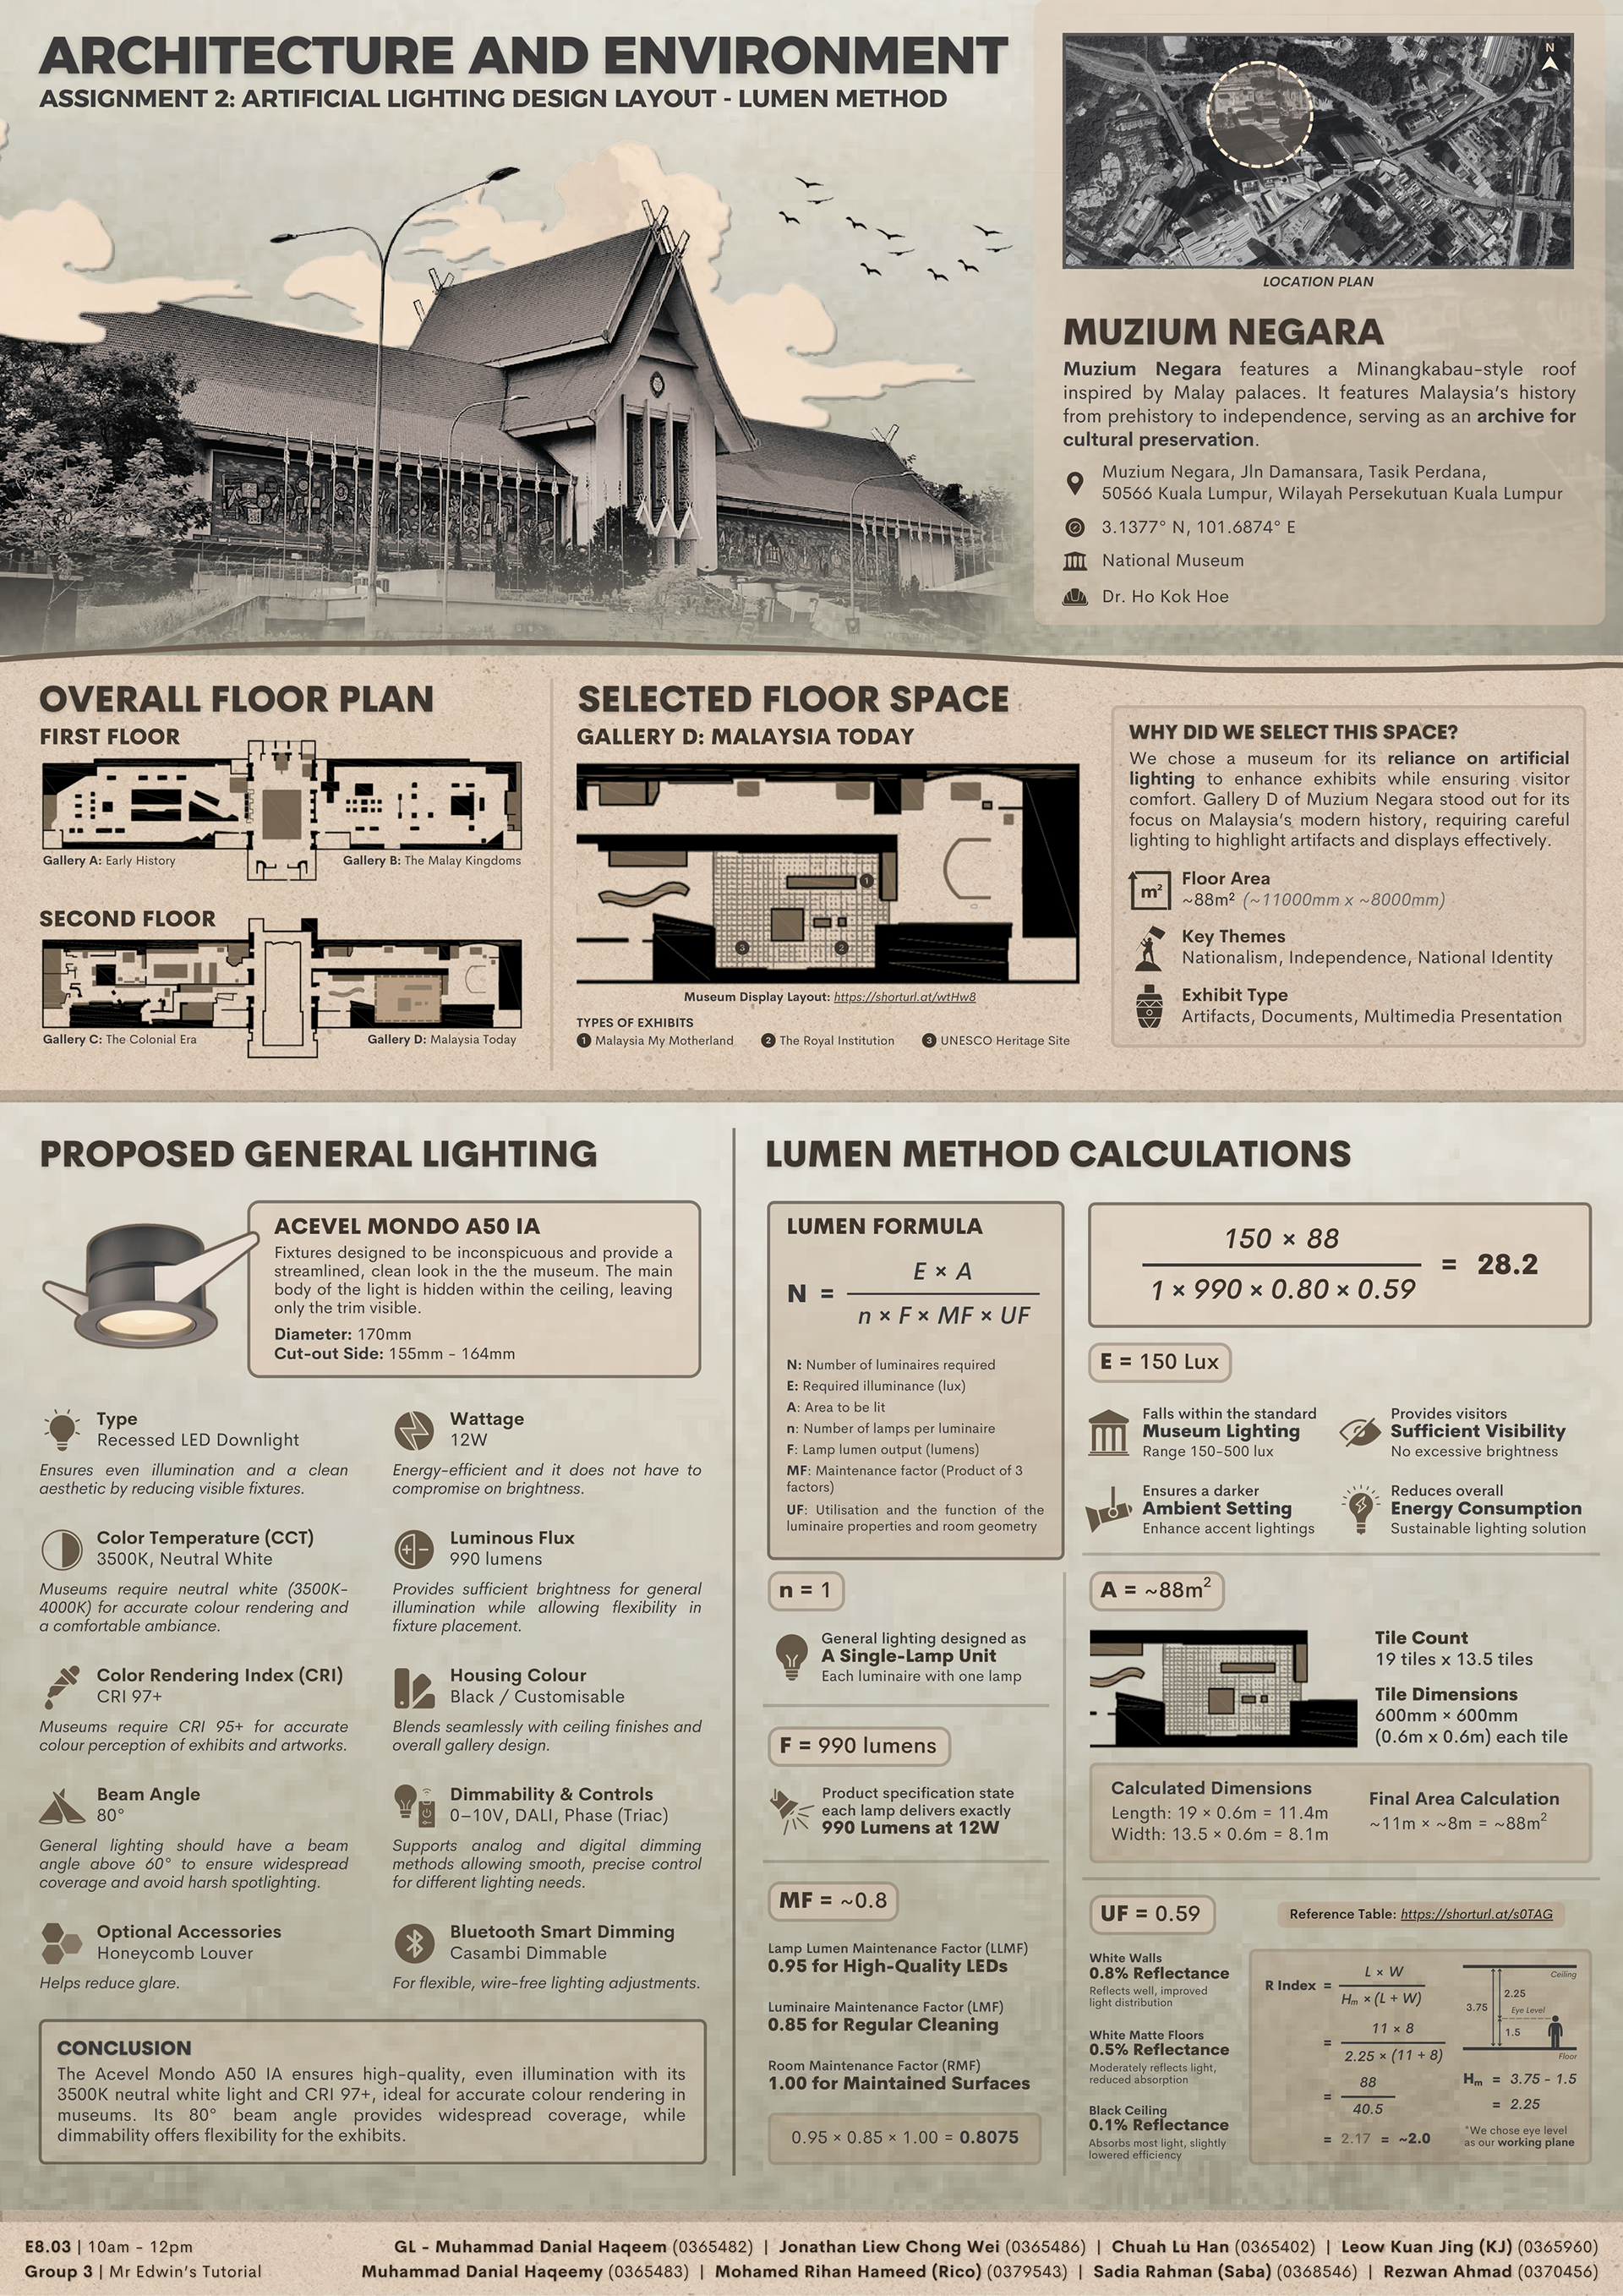
For this project, we were tasked with analysing a chosen space of our own choice and redesigning the artificial lighting using the Lumen Method. We focused on a space in Muzium Negara’s Gallery D, where we had to calculate the required number of luminaires, plan the layout, and justify every design decision to improve the lighting experience.
For this project, we were tasked with analysing a chosen space of our own choice and redesigning the artificial lighting using the Lumen Method. We focused on a space in Muzium Negara’s Gallery D, where we had to calculate the required number of luminaires, plan the layout, and justify every design decision to improve the lighting experience.
What I Learnt
Before this project, I never really thought about how much thought goes into something as simple as a well-lit space. But after diving into the calculations, fixture selection, and zoning, I realised just how precise lighting design has to be. Here’s what I took away from it:
Before this project, I never really thought about how much thought goes into something as simple as a well-lit space. But after diving into the calculations, fixture selection, and zoning, I realised just how precise lighting design has to be. Here’s what I took away from it:
1) Understanding how to calculate the required number of fixtures based on illuminance (E), maintenance factor (MF) and utilisation factor (UF). It wasn’t just about plugging in numbers but figuring out realistic values that matched the actual space.
2) I learned that beam angles, CRI (color rendering index), and CCT (color temperature) are important in selecting a lighting for a space especially in this case, how exhibits are perceived. The wrong choice could make artifacts look washed out or create unwanted shadows.
3) Where and how you position fixtures affects energy efficiency, visibility, and ambiance. I had to consider things like uniformity, glare, and how general lighting worked alongside accent lighting.
4) I now understand why museums use different switching zones. Our Three-Gang Lighting Switch let us control different exhibit areas separately, giving flexibility in adjusting lighting based on the type of display.
5) Even a small miscalculation in MF or UF can result in under-lit or over-lit spaces, affecting both the visitor experience and energy consumption. Double-checking our numbers was crucial.
What Challenges I Faced?
This project had its fair share of challenges, and each one pushed me to think more critically and problem-solve effectively. Here’s what I struggled with and how we tackled it:
1) We wanted a lighting setup that wasn’t just practical but also enhanced the atmosphere of the exhibition space. Balancing general lighting for visibilitylity and accent lighting for drama was tricky. We had to constantly refine our fixture choices and placements to get it right.
2) Not every downlight or spotlight works for a museum. We had to compare beam angles, wattage, and CRI to ensure our selected Acevel Mondo A50 IA downlights and ERCO Quinta spotlights met the necessary standards. There was a lot of back and forth before finalizing our choices.
3) Figuring out MF (0.8) and UF (0.59) based on the room’s reflectance was tougher than expected. Using the room index chart properly and making sure all our calculations checked out took multiple revisions. Getting one number wrong could have thrown off the entire lighting plan.
4) Ensuring even distribution of general lighting was another challenge. We had to consider spacing between luminaires, their coverage area, and how they worked together to avoid overly bright or dark spots. The 5x6 grid layout was our solution for achieving a well-balanced distribution.
5) Since I was leading the team, I had to make sure everyone stayed on track while also handling my own tasks, tie everything together and any unfinished work. There were times when it felt overwhelming, but setting clear deadlines and delegating tasks effectively helped keep everything moving smoothly.
Personal Reflection
In the end, I think we nailed the balance between technical accuracy and design aesthetics. The final lighting plan wasn’t just functional.. but it actually enhanced the storytelling aspect of the exhibits. Seeing how all the little details (like the beam spread, fixture spacing, and dimmability) came together made me appreciate how much thought goes into lighting, specifically museum lighting.
This project completely changed the way I see lighting in architecture. Before, I never paid much attention to it, but now wherever I go, I immediately notice the lighting choices, how they shape the mood and whether they were well-designed or not. It's got to a point that my family finds me really annoying for talking about it all the time.
More than anything, this assignment showed me that good lighting design isn’t just about making things visible but it’s about creating an experience in a space.
Learning Platforms
Lectures & Tutorials - Mr. Edwin’s sessions were engaging and filled with real-world applications. He had a habit of going off on long tangents, but somehow, they always led back to valuable insights that helped us understand lighting in a more practical way. His direct feedback was extremely useful in refining our work.
Lectures & Tutorials - Mr. Edwin’s sessions were engaging and filled with real-world applications. He had a habit of going off on long tangents, but somehow, they always led back to valuable insights that helped us understand lighting in a more practical way. His direct feedback was extremely useful in refining our work.
Microsoft Teams - This was where all the lecture slides, project briefs, and submission guidelines were posted. Anytime I needed a reference or clarification, this was the first place I checked.
Extra Research & Online Resources - Since lighting was something I wasn’t too familiar with before, I spent a lot of time looking up museum lighting standards, DIALux tutorials, and case studies to strengthen my understanding and justify my design decisions.
Group Discussions - Whether it was in class or over messages, discussing ideas with my team helped a lot. Everyone had different perspectives, and bouncing ideas off each other made problem-solving easier.
Tutor - Mr Edwin
Mr. Edwin was an absolute standout in this module. If there’s one thing I appreciated the most about him, it was his brutal honesty and direct feedback—which, in my opinion, is exactly what makes a good tutor. He didn’t sugarcoat anything, and that actually made it easier to improve because we knew exactly what needed fixing.
He also had this way of turning every lesson into a story, making even the most technical topics feel engaging. His yap sessions (which I loved by the
He also had this way of turning every lesson into a story, making even the most technical topics feel engaging. His yap sessions (which I loved by the
way), while unpredictable at times, always circled back to something relevant, whether it was a personal experience, a case study or an industry insight as a retiree. His way of explaining things made the technical aspects of lighting design way more digestible.
Most of all, his feedback felt personalised and specific to our work, rather than just generic advice. This made our project feel more guided and intentional, rather than just another assignment. His insights definitely played a big role in shaping my understanding of lighting design.
Most of all, his feedback felt personalised and specific to our work, rather than just generic advice. This made our project feel more guided and intentional, rather than just another assignment. His insights definitely played a big role in shaping my understanding of lighting design.
Photo Gallery
Some Photos I Found On My Phone Gallery To Share
Some Photos I Found On My Phone Gallery To Share